Translate

Monday, October 12, 2015

Color Packs & Stash Scraps

I have a mini skein pack fettish.

My favorite local yarn shop started carrying 5-skein color packs from Frabjous Fibers a while back, and I am always eyeing them and trying to figure out what sort of project I could use them for.  There's the obvious "just make something striped", but I've been holding out for something a little more interesting.  I even bought a couple color packs thinking that surely a pattern would pop up that would be perfect for them, but so far it hasn't happened.  And so around the middle of June this past summer, I started thinking.

"What if I wrote a whole collection that focused on smaller projects that used these lovely color packs I've been seeing at my own LYS, at yarn shops I visit while I'm traveling, and on websites I've browsed?"

"Is it nuts to think I could have a collection of patterns written, knitted, edited, tested, photographed, and ready to release by this fall?"  I was excited enough about the idea that I didn't want to wait a whole year for a fall release, and let's face it, knitting patterns get more attention in autumn than they do at other times of the year, so I didn't want to release it at an off-time.  But still, 4 months is not a long time for even a single pattern from the time I get the idea to the time it's ready for release.  Thinking I was going to have a number of patterns ready all in 4 months seemed pretty nuts.

And because I'm the sort of person who takes "that's nuts" as a challenge to see if it can actually be done, I jumped it with both feet.

I started by collecting links to yarn that I loved off of websites and the Ravelry database.  I asked around to my yarnie friends to make sure I wasn't missing any fabulous yarn dyers that sold mini-skein color pack or gradient sets, and they helped me find even more companies that I wasn't familiar with.

And then I started thinking about rough ideas - what sorts of projects would I include?  What stitch patterns did I want to use?  How would I integrate the different colors?  What color packs might match up with which ideas?

And then I did something that I honestly wasn't sure how it would go over:  I sent out proposals to yarn companies that were along the lines of "I have this idea for a pattern collection, and I would like to include your XX yarn.  I might use it for a (insert type of project here) pattern, but that might change once I know which other yarns I will be working with for this collection."  And I included a photo of about 8 different swatches of stitch pattern ideas I thought I might use that I had knit up out of scrap yarn.

I thought there was a fairly good chance that at least half the companies would send me notes back that said something like, "Nice try, wiseguy.....why don't you send us a sketch and a solid idea like a normal designer, and then we'll let you know."

But miraculously, I got a lot of "Sure!  We'd love to be included!" -type replies.  I think there was actually only one company that I approached who said they were not up for it.  And there was one company who wanted to be included, but by the the time I heard back from them, all my ideas were already matched up with color packs that had already been offered.  I still wish I could have come up with one last idea for that lovely yarn dyer!

But all in all, I came up with ideas for 13 projects.  They are everything from hats & scarves to a throw pillow and a baby dress.  There's even a shrug that will come in Child's size 6 up through Women's Med (sorry, after Women's medium, the yarn from the color pack runs out, so that's where I stopped the sizes.)


My family has been great over these past 4 months.  I knew I'd be busy; a typical year has me publishing about 12 patterns, so I knew that getting 14 patterns ready in 1/3 of a year would be pretty insane.  But my husband has picked up some slack, and my kids have been patient when I tell them I have to spend some time working.  No one even complained when I knit the entire way to South Carolina & back - by car - when we took a road trip this summer!  And so far (because some of the later releases are still being tested), test knitters have been absolutely wonderful.

So tonight I want to thank the yarn companies that took a chance on me and this project: A Hundred Ravens, Black Trillium Fibres, Frabjous Fibers, June Pryce Fiber Arts, Kim Dyes Yarn, Miss Babs, Pepperberry Knits, and Sweet Georgia Yarns.  I hope you are as pleased with the patterns I created from your beautiful yarns as I was to make them!

Tomorrow the first pattern from this collection will be released.  It'll be available for individual purchase, or, if you'd like to get the full collection at the cheapest price it'll ever be available at, you can purchase the full 11-pattern (13 project since 2 patterns are 2-project sets) eBook.  If you go this route, a new pattern will arrive in your Ravelry library each week until the week of Christmas.  And each week when a new pattern is added to the eBook, the price of the collection will go up, so if you tend to like my style, you might want to jump on the eBook when it is available this week at it's introductory price.

Happy Knitting!

Thursday, October 8, 2015

New Release: RollerGirl Raglan


I'm going to let you in on a little secret: I do my own photography.  I tried early on to have my husband take the pictures when I was playing model for my own designs, but then we decided we'd rather stay married. ;)  So for Christmas a couple years back, he bought me a remote shutter release - a little remote control thing that has a sensor that attaches to your camera so you can click pictures from farther away.  And it works out great - for the most part.

The times when I wish I did have a photographer with me are the times when I want to use public settings as my backdrop.  I often use a garden at a local community college, or various places in my yard.  Those locations are fine when it's just me and my tripod, and my remote control because people hardly ever wander by.  But I also live in a town with a quaint "square" (our tiny downtown area), and when I schlep my equipment and set it up there, I feel pretty conspicuous taking pictures of myself.  Sometimes I wonder if the people driving by are thinking that I have lost my mind and am going to ridiculous lengths for a good selfie!

So this past week, when I wanted to take pictures for my latest pattern, I thought I had a good plan: I wanted to use the back wall of one of the businesses on the square.  It is painted white and faces an alley, so it is already hidden from the main road.  It is one side of a big parking lot, but I figured if I finished up before the businesses opened at 10, then there wouldn't be many people in the lot yet.  A few store employees maybe, but certainly not a crowd.  And since this month's pattern photos had me looking quite out-of-the-ordinary, I was not looking to draw a crowd!

But....best laid plans, right?  Not long after I started shooting, a couple older women came out of the quilting store on the other side of the parking lot.  I wasn't aware that it was open before 10am, but fine.  How many early-morning quilting customers would there be, right?  They walked by me with quizzical looks on their faces, and smiled when I said hello.  Then another older woman followed behind them, eyeing up my tripod and said to me, "I was wondering why someone was taking pictures of that white wall.  It didn't seem very interesting!"  I gestured to myself, "Yeah," I laughed, "the interesting stuff is all right here!"

I kept snapping photos, and the ladies kept coming.  After crossing the parking lot, they congregated near a bench at the corner of the parking lot and I started to see their phones come out.  I laughed to myself once I realized some of them were probably taking my picture or possibly filming my little photo shoot.

In the end, there was quite a large group of them, and I figured out what was going on when I saw a tour bus pick them up.  I have no idea what sort of tour includes a stop at Peg & Lil's Needle Patch in Washington, IL, but I hope they all enjoyed their stop in our little town!  And I know some of them will have a funny story about the "roller derby girl who was taking lots of selfies" to tell their friends back home!

And speaking of roller derby girls, I have to thank my husband for hooking me up with the legit roller derby gear.  He works with a woman who is on a team, and agreed to let me use her gear.   She even gave me all of her protective pads as well, but I figured being able to see the entire sweater would be easier without extra pads in the photos.  Her gear worked out much better for the pictures than my original idea of "I'll try to borrow a bike or skateboarding helmet from one of my friends kids, and maybe I can scrounge up some roller blades, too."  I love it when pattern designs and photo shoot ideas come together as perfectly as this one!  From the very start, the rainbow color way I used for the sleeves gave me a strong "roller skating + the 80s vibe".  I thought it would be a lot of fun to do the pattern photos with a roller skating or roller derby theme, but I wasn't quite sure how to accomplish this.  In fact, this pattern has been in my idea book for about 2 years only because I wanted to make sure I knew how I'd accomplish the photos for it before I proposed it to Knit Picks.  In the end, I could not have had more fun with this design!

Details on materials needed & techniques used can all be found on the Ravelry pattern page.  The pattern is written for full bust sizes 33" - 48", and you should choose the pattern that is closest to your actual bust size.  In the photos, you are looking at a size 36" modeled on a 37.5" bust.  I went down in size because my frame is a little on the smaller size, but a 39" size would have been a good fit for me as well since I'm right in between two sizes.

I used Knit Picks Chroma Worsted yarn, which is a heavy worsted-weight yarn (198 yds / 100g).  They offer 3 solid colorways (neutral, gray & black) and a wide variety of self-striping colors - currently many of which have a glorious autumn look to them!

My perspective is probably skewed since I make a lot of fingering-weight projects, but this sweater absolutely flew by for me.  Like, I started knitting, then I blinked, and the sweater was done.  It took me about 3 days to knit the body & sleeves, and a fourth day to seam it.  It might have taken me 12 hours total.....a very satisfying quick-knit sweater!  And my test knitters unanimously agreed that this is a project that can be accomplished by an adventurous beginner.  Knowledge of only a few basic techniques is assumed, and the pattern provides links to instructions on an increase method that might not be familiar (left & right leg increases), as well as a mattress stitch tutorial that will help you seam your sleeves and sweater body together!

The RollerGirl Raglan pattern is available now on Ravelry!


Tuesday, September 1, 2015

My Favorite Thing

I hit the jackpot in the Mom Lottery.  I'm sure other people have perfectly lovely moms, but I've got one of those moms who is not only a treasure to my sister and I, but we've also spent our entire lives with everyone around us commenting on how great our mom is.  

When I was in elementary school, she wowed my friends by being the room mom who came to our third grade classroom to demonstrate how to decorate a cake.  This made such an impression on my classmates that I've had a couple of them mention it to me in recent years, a good 30 years after the fact.                                
I remember that after that visit, our teaching assistant said to me, "Has anyone told you that your mom is BEAUTIFUL?"  I'm sure that eight-year-old me rolled her eyes and answered with some sort of "Uh....I guess so."  Eight year olds don't want to hear about how beautiful their mom is.  But now that I'm old enough to own some gray hairs of my own, I'm happy to be carrying some of her genes!
Little known fact: my mom actually WAS paid to model once upon a time.  She was in her late teens, I believe.  It was for a catalog (Sears?)  She was sitting on a riding lawn mower.  We're midwesterners, ok?  So anyway, she has the distinction of being the only professional model featured so far on this knitting blog!

But don't be fooled, her real beauty goes way deeper than her appearance.  She was the mom who didn't leave me at the store when I was a bratty kid who wouldn't try on clothes when she took me shopping.  She kept supporting me in my music lessons, even when I was the kid who didn't practice as much as I should have.  If I was in a play that ran for 3 or 4 performances, she'd be in the audience.  Every single night.  Somehow she managed the perfect balance of "I'm the mom and I'm in charge" and "I'm your mom, and anything you need, I'm totally there for you."

She and I have different personalities in a lot of ways.  Like my dad, another firstborn, I enjoy being in charge (I think later-borns call that "bossy"), and I also seem to have inherited his stubborn streak.  But somehow my mom, the middle-born "peace-maker" manages those differences quite gracefully with nothing more than an occasional eye roll, and I have never doubted for a minute that I'm her favorite person on the planet.  (And, I suspect, my Dad and sister both believe she thinks the same way of them!)

So it won't surprise anyone that whenever my mom and I get together, she wants to see the projects I've been working on.  And more than once, she has declared whatever I show her to be her "favorite thing I've made yet".  Maybe my designing just keeps getting better.  Or maybe my mom isn't completely objective...  Nah, it's got to be that I keep getting better. ;)

A looooong time ago - ok, it was maybe 18 months or so - I was at my LYS and the owner showed me a shipment of a new yarn they were starting to carry.  It was Hempathy, which I was very interested in because, as a sensitive-skinned person, I'm always investigating alternatives to wool.  I saw this "Spring Green" colorway and it screamed "YOU MUST MAKE YOUR MOM A SWEATER OUT OF MEEEEEEE!"  This shade of green IS my mom's color.  And so I decided that I'd not only make her a sweater, but i'd design something just for her.  

Here she is on her birthday...you can tell it's a special day by her crown!
 And the next time she was looking at my projects, she seized the green sweater and declared it her "favorite thing that I've made"!  And I told her that, since we are similarly sized, it would help me check the fit of the back if I could see it on her.  And that's how I made sure that the sweater I was now making for her birthday would fit her properly!  I don't know if she suspected anything, but she mentioned the wonderfulness of this sweater and how very well it fit her a few more times over the coming months.  Maybe she was hoping that I wasn't committed to keeping it and was looking to find it a new home.

She works in an air-conditioned office, so I knew a cardigan that she could throw on over warmer-weather outfits would be right up her alley.  The Hempathy, since it is a cotton/hemp/rayon blend, is not an overly warm fiber.  It has a nice weight to it, and a gorgeous drape when knit to this gauge, but it wouldn't be too hot for most people to wear in 60-70ยบ weather.  I made a second sample out of wool (that one with the larger collar option), and that one would be more of a winter layering piece.

This sweater is designed to fit very closely.  My preference would be to wear it over a sleeveless top, or maybe a very fitted long-sleeved t-shirt.  The wool sample was a little less "structured" than the green Hempathy sweater.  Whereas I see the green sweater as having more of a "blazer" fit, the wool sweater had a slightly looser "cardigan" fit.  If you want to make it in Hempathy, but think you'll be wearing it over a lot of shirts with sleeves on them, you might want to consider making a size larger than what you'd normally choose.  A detailed schematic, as well as advice on how to pick the correct size are all included in the pattern.

So let's talk about My Favorite Thing (the sweater this time, not my mom)....

It features nice, extra-long sleeves that will keep you cozy even when the air conditioning in your office is turned all the way to "Arctic Blast"! (Why do they do that??)

The construction begins with a horizontal panel that helps draw in the waist and give the cardigan a gently figure-flattering shape.
I couldn't choose between my love of the smaller "blazer"-type shawl collar that I did for my mom's green sweater, and the larger "wrap-up-on-the-couch" collar I made for my gray wool sample.  So I just included instructions for both.  Pick your favorite, you really can't choose wrong!


There's me....sporting the wool sample sweater I made from Ella Rae Lace DK.  (Hempathy and the Ella Rae are both categorized as DK, but if you look at the Ravelry projects they are used for, they are most often subbed in for patterns that are written for sport-weight yarn because they are both very thin for DK.)   So if you're thinking about substituting yarns, you're going to want to look into sport-weight, or even heavy fingering-weight options.


Here's the full effect....mom modeled for me while showing off some of the flowers from her enormous garden.


I'm not sure what set her off into a cascade of laughter here, but I this was one of my favorite pictures, because that's what my mom looks like in my head.  Always in a good mood, always playing with her flowers, and always wearing this shade of green!

Thanks for modeling for me Mumsy, thanks for your general awesomeness, and thanks for being the perfect inspiration for this cardigan!

My Favorite Things is available now on Ravelry.

Tuesday, August 4, 2015

New Release: Jillian


 Last year, my local yarn shop started carrying a new Dream In Color yarn, Jilly  The colorways were fun & vibrant and I could not resist selecting a few to take home.  And then I stared at them for a few weeks thinking, "What am I going to make out of 3 different colors of fingering-weight yarn?"

I settled upon a sweater pattern that I found on Ravelry.  It was something where the gray color would be the background, the blue would be the stripes, and the green would be a little highlight color just under and just on top of each blue stripe.  I got about 5o rows into this pattern before I was willing to admit what I already suspected: this blue & this green deserved to be featured.  They didn't want to play second fiddle to the gray!

And so I set about creating a new design.  I went with the open neckline that I love so much, and raglan sleeves for an easy top-down knit.  The electric green, which is such a FUN color to wear, had to go right on top, then a 20-row striped transition brings in the blue, and later the gray.  This time the colors were very happy together, and I have people stopping me to ask about the sweater every time I wear it.  I wore it to a knitting retreat this past spring and at least 20 people stopped me to ask about it - and many of them also wanted to know where they could buy the green yarn.  I've never heard so many people say, "Green isn't really my color, but I love THAT green!"  I loved hearing that, because it's exactly how I feel about it!


This sweater is written with a few inches of positive ease built into each size.   The detailed schematic will tell you exactly how much ease you'll be getting in for the size you choose.  Make sure to choose the "To Fit" size (on the first page of the pattern) that is closest to your full bust measurement - unless you are particularly busty.  If you normally have to add bust darts or short rows to accommodate "the girls", then you'll get a better fit by choosing one size smaller than your full bust size, then adding the bust shaping that you normally add.  Another option for ladies who don't want to mess around with bust shaping is to begin one size smaller than your full bust size, then do extra bust increases until your stitch counts match the counts for the next size up once you get to the point where sleeve stitches are placed on holders and the body is joined in the round.

The wide neckline and gentle shaping of Jillian creates a sweater that is flattering whether you're a trendy 20-something or an elegant grandma.  Your only worry will be how you will ever be able to decide between all the lovely color options available!


Monday, July 20, 2015

Big, big, big!

I'm so predictable.  This is the second summer in a row that I've finished up my work projects in the spring, thinking, "Now I'll take the summer to knit some patterns I didn't write!"  And then something comes up that I just can't say no to.  Last summer it was being asked if I wanted to write patterns for two new types of yarn that were being introduced to yarn shops.  I thought "They're new yarns, my patterns will be among the first to use these as recommended yarn...it might be a good way to get my work in front of people who haven't noticed me before."  And so I wrote the Herriot Hat and Hepatica.

This summer, it's self-imposed, although the spark of the idea came from a request from my LYS owner.  And it has turned into something big.  BIG.  By far, the biggest thing I've done yet.  I'm so exited to talk about it and so happy with the way this project is shaping up, but I'm going to be a secret squirrel about it for just a couple months longer.  I can say this: it's a collection, and it has a quality that I believe will please just about any knitter.  I am having a lot of fun working on it, and I'm not the least bit sorry that I'm using my summer for this rather than knitting other people's patterns.  There's always time for that after Christmas!

Anyway, since I'm going to stay mum on what I'm knitting right now, I thought I'd put up a different crafty sort of post.  I'm still working on redecorating my living room.  I'm going with a blue/beige/muted teal sort of color pallet, and I needed an end table to go next to a dusty-blue couch.  I was out at Gordman's one day and found these two little tables.  The paint was a little too bold to really fit in with what I already had going on, but I thought that it might look nice whitewashed.  You'd still see the teal through the white paint, but it would tone it down enough to sit next to the lighter blue couch and not look crazy-bright.

I went with the table on the right because I thought it would also provide some space to stash my knitting equipment.  The blue couch is what I refer to as "my office", it's where I most often work on my knitting and writing projects, so I needed to have some storage in my end table.

I wasn't a big fan of the basket drawers included with the table - they were very rustic and I thought they would scrape the paint off the table over time.  So I stopped by the lumberyard on the way home and asked them to cut me two rectangles of wood that would fit into the basket spaces so the table could have shelves instead.  I think the wood was like $10, and gave it a "cleaner" look that I was happy with.

I also stopped by the paint store and brought the drawer in with me.  I asked hem to color match the drawer so I could get a little jar of paint to use on the shelves.  I bought one of those little sample size containers for a couple bucks.

Once I brought it home, the girl cat had to inspect it.  It passed.


I used wood glue to secure the shelves into place, then painted them with the teal paint.  I was impressed that the match was so close.

Then I took white paint and watered it down, and brushed that over all the outside surfaces of the table.  I left the inside surfaces of the shelves the darker teal, just for a little contrast.  Each coat was very thin, so I did it 3 times before it was toned down to the degree that I liked.


Here's a view of the top surface where the whitewashing is easiest to see:


And here's a view of the finished table sitting in place in the living room.  I'm still working on finishing up the room decor, so I don't have any cute little containers for my knitting paraphernalia yet, but you get the idea!

Tuesday, June 30, 2015

New Release: A New Leaf

I'm happy to release a new shawl pattern today!  This one is called "A New Leaf"

Construction begins with the leafy lace border.  Once you've knitted a long strip of lace, stitches are picked up through yarn-over holes, then the shawl body is worked almost entirely in stockinette stitch.  Once the border is complete and you've moved on to the body of the shawl, it's great "tv, road trip, or social knitting" if you're looking for a fun project that doesn't require too much brain power!

 I wouldn't call the lace border difficult, either...it just takes a little more focus than plain Jane stockinette!

Border instructions are offered in both written and charted form so you can work from your preferred format.

Body instructions (since they're so simple) are only in written form.


 If you knit to pattern gauge, the finished size is a nice, big 70" wingspan and 21.5" at the deepest part of the gentle triangle shape.  If you prefer a different size, or if you would like to use a yarn weight other than fingering (and needles that are appropriate for your yarn weight), instructions are given on how to easily modify this pattern.


Many thanks to Elin76, ekolatch, & DeChertsey, the trio of test knitters who pioneered this project.  I appreciate the time and work that all three of you put into your projects, and the feedback you gave me about your experiences with the pattern!

I am also thankful for my lovely friend who modeled for the pattern pictures.  We took them on a misty evening, and she was a trooper to help me get photos done while there was still light to do it, and not worrying about the possibility of getting an extra shower in the process!
If you are looking for a fun summer knit, you can click here to purchase A New Leaf!


Happy Knitting!

Wednesday, June 3, 2015

New Release: Wavelength Tee


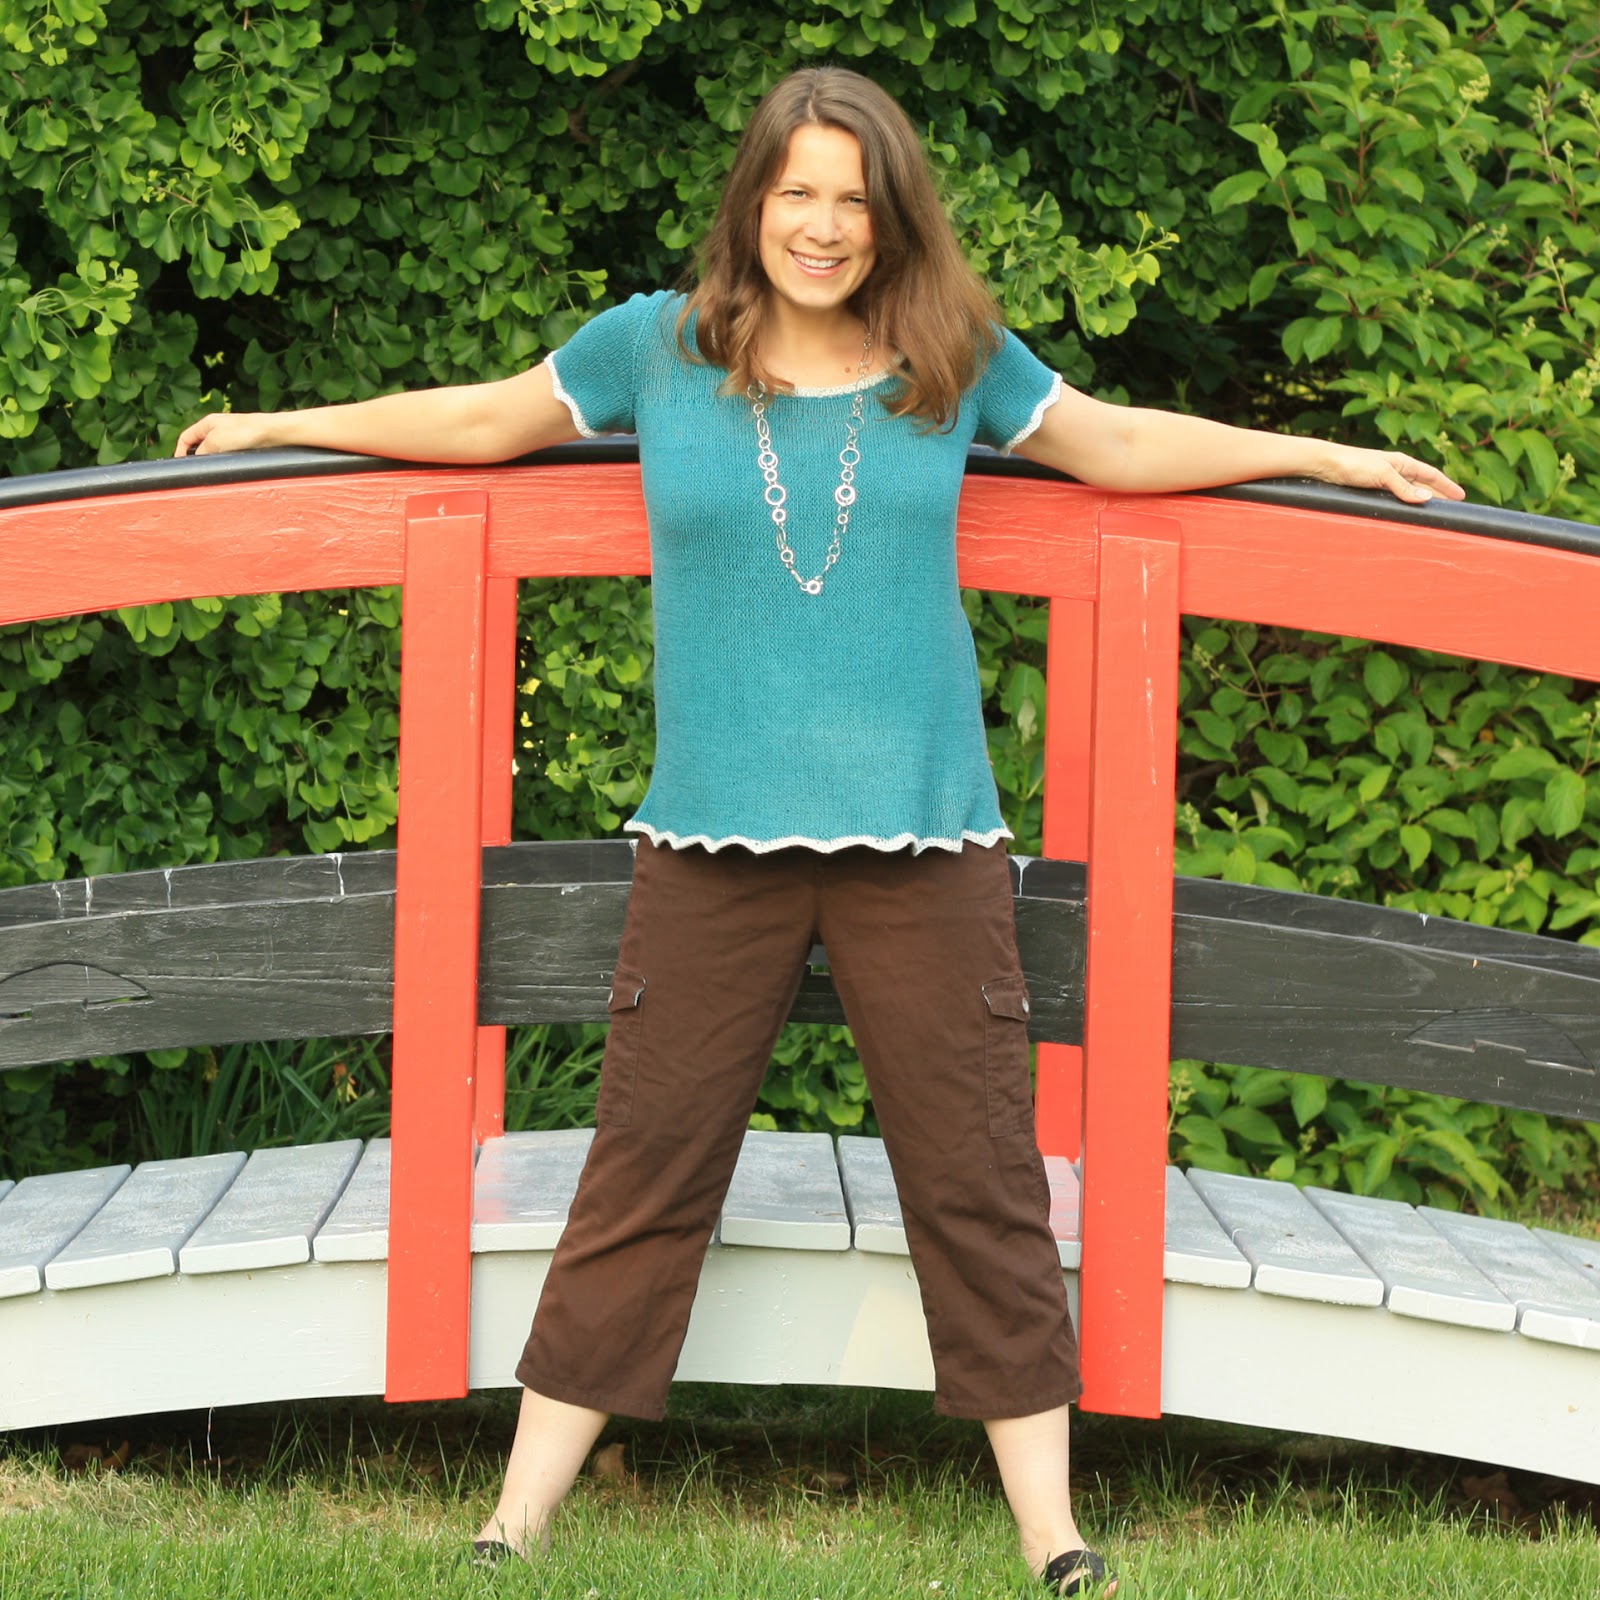
 You know what the 2014-2015 school year was going to be as far as my pattern writing was concerned?  I had declared it the "Year of Accessories".  After publishing a dozen patterns the previous school year, with six of them being garments, I decided I needed to scale back a little bit this year.  I think I did pretty well....11 patterns published with one more ready to go next month will still make 12 for this year, but only 3 of them were garments.  I really did have fun focusing so much on accessories.  But sometime during the winter my local yarn shop got a new order of Hempathy delivered, and when I saw the blue-green color, I couldn't resist designing a summer top for myself!


My favorite tops are usually loose without looking baggy or oversized.  The fit I chose for this one keeps the upper chest & shoulder areas at close to zero ease, but the body is loose and flowy with plenty of room for one more cookie.  The back is fitted as well, which helps keep the tee from looking oversized.


I also really enjoy the versatility of this style.  I could wear it to church or to a "business casual dress"-type of job paired with dress pants of capris.  But since I work from home, I'll usually be pairing it with jeans or shorts for a more casual look.


The hems of the body and sleeves use a 3-row stitch pattern that creates a gentle wave.  Lay the garment flat after washing for a subtle wave when dry, or use pins to emphasize the waves for a more pronounced undulation.


I used Hempathy for this project, and I can't say enough good things about this yarn.  It's easy on the hands, has no itch-factor so it's very wearable for this sensitive-skinned girl, and it gave a flowy, drapey fabric when knitted to pattern gauge.  It's listed as a DK-weight yarn, but I can't compare it to any DK-weight yarns that I'm familiar with.  (It knits up as a much lighter yarn - look at the photo to the right, under the arm where you can see the light shining through the fabric.  Yes, the gauge I use in the pattern is technically in the dk-weight range, but the fabric is VERY thin when knit to that gauge.)


It's also a pretty unique yarn as far as its fiber content.  Test knitters on this project found it difficult to approximate the fabric density and drape of the Hempathy with substituted yarns.  Often, when I publish patterns, I think it's fine to use substitute yarns and even list them on the pattern page when I am aware of yarns that would be a good match.  But for this project I'm going to recommend that knitters use Hempathy rather than substituting.  (And I say that with no connection at all to the Elsebeth Lavold, the yarn company that makes Hempathy.  They have never given me any sort of payment in the form of money or yarn support for this or any other pattern I've published.  I just think you will not be disappointed with this yarn and want to see you get the nicest finished project possible!)

If you must substitute, do it with this in mind: Hempathy is 34% hemp & 25% modal (both fibers are thin and very drapey like linen), and only 34% cotton.  In this yarn, the linen-like qualities of the hemp & modal far overpower the cotton qualities.  (In my experience, cotton is often "puffy" and sheds quite a bit.  Hempathy has neither of those qualities.)  Finally, there are 153 yards of Hempathy in each 50g ball.  So appropriate substitutes would have fiber content that is about 1/3 hemp/modal/linen and 1/3 cotton.  It would also contain close to 153 yds per 50g ball or 306 yds per 100g skein.  If the substitute yarn has less yards per ball/skein with a similar fiber content, then the yarn is going to be too thick.  If it has more yards per skein with a similar fiber content, it is going to be too thin.  For my personal projects, I use the 10% rule.  If I'm trying to substitute for a yarn that has 153 yards per 50 g ball, I can use yarn with a very similar fiber content as long as it is + or - 10% of that yardage.  So it could contain between 138 and 168 yds per 50g ball, and I am pretty safe assuming that I will be able to achieve gauge (maybe going up or down a little in needle size) AND I will get a resulting fabric that is a reasonably close match to what the designer intended.

I hope that little explanation helps, and I hope you find this an enjoyable summer knit!  I'm happy that mine is all finished and I'm actually wearing it as I type this.  It's perfect for the beautiful "highs in the 70s" sort of day we had in Central IL today!

The Wavelength Tee pattern is available now on Ravelry!