Have you checked out Craftsy.com yet?
They're a newish website that is all about crafts of every type. Want a pattern telling you how to make a piece of beaded jewelry? They've got 'em. Want to make some adorable soaps disguised as bath toys for your kids? Join the Bath Crafts for Kids workshops. Maybe you want to learn how to make your own gorgeous flower accessories out of fabric....they've got that, too.
Seriously, this website has everything.
Over the last few months, I've been participating in some of their on-line knitting classes. I started with the "Sizing Knitwear Patterns" class. It really is a good class if you're someone who wants to design your own knits and just doesn't quite understand how to do the math, or if you're a brand new designer who knows how to make things to fit yourself, but doesn't quite understand how to grade the pattern for a range of sizes. I got through about half the lessons before I was ready to admit I really wasn't going to get anything out of the class, but that's only because I've spent the last 2 years devouring everything I could possibly read about designing and applying it to the patterns I've written. If I had found this class a couple years ago, I would have saved myself a lot of time & effort!
Next, I zipped right through Debra Robson's "Know Your Wool" class. Learning a bit about the different types of wool as well as the properties of different fibers was really interesting, and the class was only about 6 short lessons. I finished it up in one weekend.
I've been slowly but surely making my way through "How to Say It: Pattern Writing for Knitters". It's another one of those "If only I had done this class 2 years ago!" experiences. Most of what the instructor is covering are things I've already learned through the last few years of reading, writing, asking lots of questions, and finding out what works well for the knitters who buy my patterns. Still, I did finally get down to developing a formal style sheet, and I will stick with the class until the end. Even if I already know most of what's being covered, it never hurts to review some of these points.
I'm also about half-way through Carole Feller's class on Short Rows. I was already familiar with the "regular" method of wrapping & turning, and her "modified" technique where you unwrap the stitch and hide the wrap behind the stitch when you're working the wraps in. But she also teaches you the Japanese short row method as well as a yarn-over short row method (I haven't watched the class for the yarn-over method yet!) It's always nice to have a variety of techniques that serve the same purpose. Sometimes one method works a lot better in certain situations or with certain stitch patterns. So I look forward to being able to incorporate these new techniques into my knitting & into my patterns.
In the meantime, I highly recommend you check out the Crafty class catalog. They even offer a few of their classes as free mini workshops (the short row class & the know your fiber class are both free!) so you can check them out and see what you're in for before you register for any of their paid classes.

Thursday, March 28, 2013
Tuesday, March 26, 2013
Cabled Socks


I put some simple ribbing on the legs to help keep them from falling down.... And...what? What was that? There's only ribbing on one of the cuffs?

You mean I was in such a rush to finish this project that I completely forgot to work the ribbing all the way up the second leg?

Maybe we could just call it a design choice and move on?
After all....it's really not that obvious, right?
Well, until you take the socks off that is.....
Rippit....rippit....rippit....
Monday, March 25, 2013
Join the Club!
So last week, I took a plunge that I've been thinking about for a long time. I created a Ravelry group for my design business!
I hesitated for a long time - I was concerned about over-committing myself on the internet; after all, I already have a blog and a Facebook business page that I sometimes feel like I have a hard time keeping up with. But I finally decided that if I could find a couple other Ravelers that I trust to kelp me moderate the group, then it would take the pressure off a little. I also used to wonder if I created a group, would it just be me and a couple other knitters virtually hanging out together in our deserted internet club house, but over the past 6 months or so, I've had enough people suggest to me that I should create a group that I figured that there would at least be a handfull of willing members.
So color me surprised when I created the group last Thursday and within 24 hours it had more than 80 members! It's fun to me to know that so many Ravelry members that have been so encouraging to me, who have helped me in so many ways, and some whom I have been able to help, are all in one place chatting with each other and sharing a little about themselves. It reminded me of a wedding in a way, where people from all sorts of aspects of your life come together in one room for a big party - you've got your family there, your childhood friends, college friends, work colleagues, and then all of your groom's people all there together. A lot of the people who have joined the group have worked on different test knits for me, but there are also people who have encouraged me on Facebook, some whom I have started corresponding with through Ravelry on a more friendly level, some people who have just knit some of my patterns, and some people who have joined because they have enjoyed either reading the blog or some of the things I've written on Ravelry. One woman wrote me a nice note saying that I helped her with a sweater she was making a couple years ago and that she joined the group because of that.
I'm glad I finally went ahead and did it. It'll be really nice to have a place where I can host knit-alongs for some of my patterns. I'll have a place to show off new releases and things that I'm working on. People have already posted some photos of projects that they've made from my patterns for the other group members to see. And it's been fun to see what people are writing to introduce themselves. Even if I've chatted with a person over a time span of 6-8 weeks during a test knit, I don't necessarily find out much about them personally, so I've enjoyed reading the details people have shared about themselves. I think it'll also be nice to have a forum where people can ask questions about patterns and, rather than type the same response to 5 different people asking the same question over e-mail, there will be a place on the web I can refer them to where I've already answered the questions that they're wondering about.
So if you haven't noticed it yet, the Trappings and Trinkets Ravelry group can be found here. Join us, introduce yourself, and use it as a place to meet a group of lovely knitters and keep up with everything that's going on in my little world!
Saturday, March 23, 2013
Brave New Steekers!
I had a fun time with 4 new steekers this afternoon. Every last one of them ended up catching on, and fearlessly chopped their projects right down the middle. We only had one person end up with a small hole, but luckily she was practicing on a swatch, and I think she may have accidentally cut a bar that wasn't supposed to be cut. Sometimes with the single crochet reinforcement, it can be a little tricky to see exactly what you're cutting!
Most of the knitters brought fair isle coffee cozies to cut as their practice projects. I was pleasantly surprised that all 4 ladies already knew how to crochet. So I didn't really have to spend any time going over the slip stitch or single crochet stitches, I just had to show them how to use those stitches to create reinforcing chains on either side of their "cut line".
I think the biggest hurdle to get over when learning to steek is just the fear that the project that you spent so much time and money creating is just going to unravel once you start to make the cut. So I kicked off today's class by chopping a swatch of 100% wool right down the center with no reinforcement at all. Stitches really do not want to unravel along a vertical edge. If you pick at the edges and really manhandle the edge, you can get the edge stitches to work free, but you would really have to put a little effort into making an edge really come apart. I think that once you get over the fear factor, it's a lot less intimidating to take on a steeking project.
So thanks to Liz, Faith, Debbie & Michelle for joining the class today! And thanks to Melinda & Erin, the best yarn shop owners you'll ever meet, for recruiting me to teach this class in the first place!
Thursday, March 21, 2013
Back to Teaching

I have an hour and a half, so my plan is to talk for about 5 minutes then launch right into demonstrating & teaching the different ways to steek. I'll include a little background about why you might choose to steek over knitting something flat, which fibers are good & bad for steeking, and the different choices you have for reinforcing the fabric before you cut. After that, we'll have plenty of time to practice the different reinforcement stitches.
I'm not a crocheter. My great-grandma did try to teach me to crochet once upon a time- I made a few chains of slip stitch, and that's about it. One of these days, I am going to sit down and learn a little more about the craft, but it's just not at the top of the list right now. Nevertheless, it was very easy to master both the slip stitch and the single crochet and learn to use these two stitches reinforce a steek.

In the photo at right, you can see that three of my swatches are already steeked. The one on the far left was reinforced with a chain of single-crochet stitches. The one in the middle was done using a slip-stitch chain. Neither way is necessarily "better" than the other, but they each have their own purpose. If I want to fold my cut edge back and sew something over it, I am going to want the least amount of bulk possible along my cut line. So for this situation, I'd choose to use the slip stitch. On the other hand, if my steeked edge is going to be exposed, and I want the nicest-looking edge possible, I'd go for the single crochet chain because the extra yarn covers up a bit more of the cut edge and gives a more "finished" look.
The brown swatch on the far left was cut with no reinforcement because it's 100% wool. Doing it this way can be a little messier at first, but over time with wash, wear & handling, the little messy pieces on the edges will felt and "lock" into place. I probably wouldn't choose to steek an actual project without any reinforcement chain, just because I like how the crochet neatens up the edge, but I cut this swatch without any reinforcement just to show the people in the class that it can be done (with 100% wool) and that the stitches really don't want to unravel along a vertical edge.
So, I'm all set. Armed with swatches, hand outs, crochet hooks and scissors, I'm ready to pass my love of steeking on to a few new knitters. I wish you could join us!
Monday, March 18, 2013
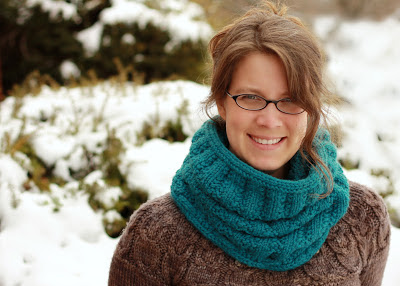
New Release: Commuter Cowl


Before the weather starts warming up, I wanted to squeeze in one more cozy winter knit! The Misti Alpaca yarn that I made the smaller sample cowl from has been staring at me for the last few months, encouraging my mind to drift with visions of chunky, squishy stitch patterns. The modified ribbing pattern I chose for this cowl has an easily-memorized 2-row repeat, which makes this a great on-the-go project to take with you on your morning train ride into work, or to your knit night, where you'll have an easy stitch pattern that won't distract you from socializing!

This cowl comes with two options - a smaller cowl, or a larger size which can be worn squished down, folded over, or pulled up over the head like a hood. Done in a lighter-weight yarn (with added stitches, as the pattern suggests), this could easily be a fun accessory for indoor wear as well.

I've been wanting to try Knit Picks new "Biggo" yarn, so this was the perfect opportunity. It took a little less than 4 skeins to create the larger cowl, and the 50/50 merino/nylon blend is very friendly for my sensitive skin!

You can enjoy $1 off with the coupon code "Commuter 2013" if you purchase the pattern before next Monday (March 25) on either Ravelry or through the link on this knitting blog.

Happy Knitting!
Thursday, March 14, 2013
Yarn Stop
 This past weekend, our family had a little traveling to do. Our junior high-aged son is part of his school's math team, and they came in 3rd at the regional competition, so they were going to compete at the state MathCounts tournament near Chicago. As you might imagine, a math competition isn't something that really goes well with having an audience, so my husband, daughter and I had a nice chunk of time to entertain ourselves on Saturday. We had made plans to meet up with a college friend and his family, but we still had about an hour to kill before we were supposed to meet them at IKEA (I know - do we know how to party or what?) So, thanks to the "Knitting and Yarn Shop Locator" app on my iphone, I easily picked out a nearby yarn shop for us to explore. I knew it would be a hit, because not only did it appear to be a really nice yarn shop (which I would love), it was also a coffee & pastry bar (which I knew would appeal to my husband & daughter!)
Knitche in Downers Grove did not disappoint. It was in their cute downtown area in a lovely historical building that was a blacksmith's shop once upon a time. Where a more typical yarn shop might have a few stuffed sheep strewn about, they had bit of horse decor as an homage to the roots of the shop. Anyway, the downstairs area was packed with dk & bulkier yarns in all sorts of brands.
 I explored the second floor a bit and found a couple rooms full of yarn that wasn't my favorite. It was mostly cotton & acrylic, which I don't usually gravitate towards. There was a class going on upstairs, too, so I didn't poke around too much.
I gathered three different types of yarn and made my way to the register. I was a little confused because they didn't seem to have much selection of fingering or lace-weight yarns. I asked about this as I put my selections on the counter and the woman asked me if I had found the room of lightweight yarns upstairs. I told her I had seen the rooms of cotton & acrylic, but she told me I had missed a room.
She led me back up the stairs and we squeezed past the class that was still going on, and I saw the motherlode. Yes, I definitely had to re-think my purchases after experiencing this room!

This first skein is some Jitterbug Fingering-weight yarn. It's not super, super soft, which gives me hope that I could make something like socks with it, and they wouldn't wear through in a matter of a few weeks.

Look closer. See the little flecks of color? From far away it looks like a tonal brown, but up close there's blue, orange, green, and a little yellow.
It was all I could do to resist their crazy-bright hot pink color way with little bits of black & yellow in there. I don't know what it is with me and bright pink yarn, but I'm like a magnet for it. Then I think for a moment about "what would I actually make from this pink that screams so loudly?" and I can't come up with much. It's just too intense for actual use! (Well, for me, anyway.)


So, who's next? Yes - Dream in Color's Everlasting Sock. This one is also not super, super soft (in the skein), but in my limited experience with Dream In Color yarn, it washed up WAY softer than it was while I knitted it. So the real feel of this still waits to be seen.
I must have been in a blue phase on Saturday, because 3/4 of my selections were mostly blue. This one had some browns, beiges & grays in with it though, which made it really interesting to me. I have no specific ideas for this one right now, but it'll be good inspiration yarn to look at for a while. It'll definitely be some sort of winter accessory though - this colorway screams "winter" to me.

Another brand I was excited to find was Fleece Artist. I have been listening to the Fat Squirrel podcast, pretty much from the beginning, and she has made several references to yarn from this company, so I've been interested to have a chance to pet it and see what I thought. I purchased a skein of their Basic Merino Sock yarn. It was in the color of the day - a blue-y, green-y combo with lots of lighter & dark tones all mixed together. This yarn is really tightly twisted, which should help it wear well if I do make socks from this 100% merino yarn.


I'm glad you could come along on a little yarn crawl with me today! I hope you get to go on one of your own sometime soon!
Tuesday, March 12, 2013
New Release: Hearth Sweater for Girls
March is going to be a big month for pattern releases from me, and I'm kicking it off with a girl's pattern I've been loving (so much that I also sized it for adults so I could have one for myself!) Check out the Hearth Sweater for Girls!


I originally bought the Elsebeth Lavold Silky Wool yarn that I used for this sample sweater in a yarn shop in Delafield WI called Knitch. I suspected it would become a child-sized cardigan, and I would have had enough, if I hadn't decided that this sweater needed a hood. Enter my local yarn shop to save the day. I mentioned my dilemma to one of the owners of The Fiber Universe in Peoria, IL and she told me that they were actually going to start carrying this particular yarn line very soon. She even offered to make sure their first shipment would include a few skeins of the color I needed. (I know...could they BE any nicer?)
Anyway, the new yarn wasn't a 100% match, but it was really, really close, and because I used the new skein for the hood, I don't really notice a difference in the color.

So next time you're looking for a stylish, versatile knit for your favorite little girl, I hope you consider the Hearth Sweater. It's a pretty basic cardigan pattern with a few special touches: the hood, extra-long sleeves, and double-knit belt that attaches to the sweater with buttons rather than belt loops, so if your girl wants to wear it without the belt, there are no "vestigial belt loops" hanging there making it look like something's missing.

Monday, March 11, 2013
Taking a Deep Breath...
I think I can,
I think I can....

Breathe in.....breathe out......
You know that thing where you're working on a sweater and you suddenly realize that you've knit 15 rows past the point where you're supposed to start increasing for the bust?
And so you frog those 15 rows because you know you have to. Then you decide to frog another 15 rows because you made a mistake back that far with one of the cable crosses, and, although you fixed it after the fact, it still doesn't look as good as it would have if you had just done it right the first time.
So you get the project back on the needles and are just about back to the spot you were at when you did the frogging. But suddenly, you realize that one of the cable crosses looks a little funny. And since you're the designer of the pattern, you figure you'd better just make sure that you didn't type a front cross when it was really a back cross. So you look at the original chart and see that, yes indeed, you have screwed up this one cable.
And so you realize that you have to frog AGAIN, but this time it'll be all the way back down to the ribbing at the bottom of the sweater.
Oh well....add it to the list of things I refuse to get worked up about, right under "bad haircuts" and "kids who won't dress warmly in winter". I know in the end I'll be glad I took the time to do it right.
I think that after this project though, my cable fettish might be cured for a while!
Saturday, March 9, 2013
Cable-y Goodness!
I've been feeling cable-y lately. First, the cable-needle-less twists of the Twisted Hipster hat and now a fancy cable on something else entirely.
 I think you've seen the swatch I worked up for this cable done in tweedy orange yarn. I'm making this lovely for the Knit Picks IDP program, and when I took a look at their color selection in the yarn I wanted to use (City Tweed Aran/HW), I was really torn between the orange and the Jacquard blue. I finally went with blue because I'm releasing an orange sweater later this month. I thought I'd make an attempt at knitting my sample garments in a variety of colors and this lovely, rich blue is unlike anything I've used so far.
Here's the bad news: it's a garment you'd wear in chilly weather, and since I haven't even knitted the sample yet, it's not going to get tested in time to release it while it's still chilly in the northern hemisphere. So I'll be keeping this one somewhat under wraps until next fall. (Eek! SO HARD TO DO!!)
 I thought I'd show you how I swatch, too. I'm always a little yarn-paranoid when I'm knitting, nervous that somehow I've underestimated the amount I've bought and afraid that I'm going to run short. I can't actually remember ever coming up short at the end of the project, but my paranoid persists, regardless of reality. So, to aid in my ability to use every last inch, I always leave my swatches attached to the balls of yarn I knit them with, so I don't have extra joins in the middle of my projects. So, I can knit two swatches, one from each end of a skein, bind them off and knot them at the end, then I hand wash them and allow them to dry.
For this sweater, I ended up having to do 6 separate swatches, but it's all good....I finally have all the gauge measurements I need! Here are 4 of them - numbers 5 & 6 have already been unraveled and used in the project!
 I think you've seen the swatch I worked up for this cable done in tweedy orange yarn. I'm making this lovely for the Knit Picks IDP program, and when I took a look at their color selection in the yarn I wanted to use (City Tweed Aran/HW), I was really torn between the orange and the Jacquard blue. I finally went with blue because I'm releasing an orange sweater later this month. I thought I'd make an attempt at knitting my sample garments in a variety of colors and this lovely, rich blue is unlike anything I've used so far.
 Here's the bad news: it's a garment you'd wear in chilly weather, and since I haven't even knitted the sample yet, it's not going to get tested in time to release it while it's still chilly in the northern hemisphere. So I'll be keeping this one somewhat under wraps until next fall. (Eek! SO HARD TO DO!!)
 I thought I'd show you how I swatch, too. I'm always a little yarn-paranoid when I'm knitting, nervous that somehow I've underestimated the amount I've bought and afraid that I'm going to run short. I can't actually remember ever coming up short at the end of the project, but my paranoid persists, regardless of reality. So, to aid in my ability to use every last inch, I always leave my swatches attached to the balls of yarn I knit them with, so I don't have extra joins in the middle of my projects. So, I can knit two swatches, one from each end of a skein, bind them off and knot them at the end, then I hand wash them and allow them to dry.
 For this sweater, I ended up having to do 6 separate swatches, but it's all good....I finally have all the gauge measurements I need! Here are 4 of them - numbers 5 & 6 have already been unraveled and used in the project!
Thursday, March 7, 2013
Staying Afloat
I've had a week. For real.
I wrote a blog post about it last night, and it's just waiting for a specific picture before I can publish it.
In the meantime, I took 600 other photos today because I've been photographing a new cowl/hood thing. Side note: Do people wear giant hoods like this? I'm guessing that perhaps people who live in cities where they spend a significant amount of time walking might enjoy a really warm hood such as this. But as a suburban/rural lady, I just don't get cold enough in my car to warrant a giant wool hood. If I was an outside winter-walk-taker though, I might!
Anyway, here are a few from this morning....
 I'm sure that lots of girls, like me, had about 5 minutes during their teen years where they thought it would be fun to be a model. Someone else does your hair and make-up, you get to wear fun clothes, and really, how hard can it be to pose for a camera?
Let me just pause here and say that I took about 600 pictures today, and about 20 of them were keepers. It's that hard to pose for the camera!
Anyway, I'm 5'5", like to eat chocolate chip cookies, and enjoy spending my days doing things that really make me think, so it's not like I spent more than 5 minutes thinking about the fantasy of what it might like to model. On top of that, I'm not a person who really "does" her hair, nor am I particularly skilled at applying make-up. However, I have been working through a little health problem over the past year though that causes me to have hives, or at least weird red streaks, randomly on my skin a good portion of the time. So in the absence of make-up skills, I've developed a good relationship with the "airbrush" option on my photo editing software!

So mornings when I know I need to photograph my knitwear are not my favorite. And this morning, I knew I had to have my hair up, in order to clearly show the cowl, so I had to scrounge for bobby pins. I don't think I did too badly....I attempted to look at Pinterest for hair ideas, but everything I clicked on was just a photo of a hair style, no instructions. Fail. It appears that people are forgetting the "please link to original web post" rule that makes Pinterest such a great site.
If I was smart, I'd start recruiting more adult models so I could just play photographer. But it's just so much easier in the knitting process to double-check the fit on myself as the sample garment is coming together and not have to worry about checking in with someone else. Plus, I do like being able to do a photoshoot on the spur of the moment if the weather is cooperative or the environment is just right. (Today's snowy shoot won't work after today since the snow is supposed to melt this weekend. And when I went out to shoot my Hearth Sweater in January, I had an amazing foggy day that I got to use as a backdrop. That's tricky to do when you're trying to coordinate schedules with someone else!)
 At any rate, I did manage to get clear shots of everything I needed. Or, more accurately, I got clear shots of most of the things I needed to show, but I had one gaping hole in my photography, which I realize when I got home and downloaded the photos from my camera. So, I went outside and finished in my yard. Good thing everything is covered in snow...it makes my yarn appear more or less photogenic!
Feel like taking this pattern out for a spin? Click on over to the test thread here!
So that's it for now....I promise to get the other picture taken as soon as possible so I can share a little more with you about the week we've had around here!
I wrote a blog post about it last night, and it's just waiting for a specific picture before I can publish it.
In the meantime, I took 600 other photos today because I've been photographing a new cowl/hood thing. Side note: Do people wear giant hoods like this? I'm guessing that perhaps people who live in cities where they spend a significant amount of time walking might enjoy a really warm hood such as this. But as a suburban/rural lady, I just don't get cold enough in my car to warrant a giant wool hood. If I was an outside winter-walk-taker though, I might!
Anyway, here are a few from this morning....
 I'm sure that lots of girls, like me, had about 5 minutes during their teen years where they thought it would be fun to be a model. Someone else does your hair and make-up, you get to wear fun clothes, and really, how hard can it be to pose for a camera?
 Let me just pause here and say that I took about 600 pictures today, and about 20 of them were keepers. It's that hard to pose for the camera!
Anyway, I'm 5'5", like to eat chocolate chip cookies, and enjoy spending my days doing things that really make me think, so it's not like I spent more than 5 minutes thinking about the fantasy of what it might like to model. On top of that, I'm not a person who really "does" her hair, nor am I particularly skilled at applying make-up. However, I have been working through a little health problem over the past year though that causes me to have hives, or at least weird red streaks, randomly on my skin a good portion of the time. So in the absence of make-up skills, I've developed a good relationship with the "airbrush" option on my photo editing software!

So mornings when I know I need to photograph my knitwear are not my favorite. And this morning, I knew I had to have my hair up, in order to clearly show the cowl, so I had to scrounge for bobby pins. I don't think I did too badly....I attempted to look at Pinterest for hair ideas, but everything I clicked on was just a photo of a hair style, no instructions. Fail. It appears that people are forgetting the "please link to original web post" rule that makes Pinterest such a great site.
If I was smart, I'd start recruiting more adult models so I could just play photographer. But it's just so much easier in the knitting process to double-check the fit on myself as the sample garment is coming together and not have to worry about checking in with someone else. Plus, I do like being able to do a photoshoot on the spur of the moment if the weather is cooperative or the environment is just right. (Today's snowy shoot won't work after today since the snow is supposed to melt this weekend. And when I went out to shoot my Hearth Sweater in January, I had an amazing foggy day that I got to use as a backdrop. That's tricky to do when you're trying to coordinate schedules with someone else!)

Feel like taking this pattern out for a spin? Click on over to the test thread here!
So that's it for now....I promise to get the other picture taken as soon as possible so I can share a little more with you about the week we've had around here!
Friday, March 1, 2013
Twisted Winner!

MaryAnne, aka RowdyGirl who is a knitter in New York!
She picked the "Springtime" green yarn because it will be a lovely contrast to her red hair.
Congratulations, MaryAnne! I'll leave this up all weekend and let you find it and contact me with your mailing address. If I don't hear from you by Monday, I'll message you through Ravelry. Also, please let me know if you prefer I mail your yarn in hank or cake form.
(Just in case anyone is interested, when I am figuring out which comment is #33, I count from the first comment posted - you can see from the date & time stamp that Kath was #1 - and I skip over the two replies that I posted. I can't win my own contest, so my posts don't count. :)
Thanks for all who took the time to stop by and leave a comment, and thank you also for all the kind words. While I ultimately design "for myself" (meaning I make things I would want to wear and don't worry too much about what I think will sell well), it's always thrilling to know that other people like the things I create, too. I hope you will continue to keep an eye on me, because I plan to continue to bring you lots of new fun things to knit!
If you weren't lucky enough to win this giveaway, but you'd still like to make this fun hat, please purchase the pattern either through Ravelry or through the pattern link on my blog pattern page (click the "Patterns" tab at the top, then scroll down the page until you see the hat.) Both of those pattern sources actually check out through Ravelry (you don't have to be a member to purchase patterns) and will allow you to take $1 off with the coupon code TnTBlog . If you have already purchased the pattern, please let me know and I'll send you a $1 refund through paypal. (Except for you, Debbie...I saw your comment about buying the pattern, so I've already got your refund taken care of!)
Happy Knitting!
Subscribe to:
Posts (Atom)